I know you are a photographer and one may think of using several other free software for photo editing, but learning Photoshop has its advantages. My main reason to learn photoshop is because of its great helpful community.
You will find many resources, plugins, actions and help online in a matter of few seconds. So my time to clicking photos and editing them in Photoshop is valuable. I like the way this software has turned into and I love the features and things it can do.
Learn creating splatter text effect in photoshop using images and brushes. In this tutorial we will work with several layers which are needed to be merged and placed attentively.
Here we’ll also use clipping mask which will help you in learning how to hide parts of your image.

We’ll also use set of brushes by working with it you can show your skills. Following steps make you learn splatter text effect easily.
Step 1: Create a new document

Click File>New. In New window, set 235mm Width, 180mm Height and 300 Resolution.
Step 2: Edit Background

Select Gradient tool (G) and change first color to #05293b and second color to # 0a5d78. Select linear gradient and drag outward.
Step 3: Type Text

Select Horizontal type tool (T), choose bold font ( Font used: Cooper Std, Style: Black, Size: 150pt). create separate layer for each letter.
Step 4: Rasterize Layer

Hold shift and select all the Text Layers, then right-click and choose Rasterize Layer.
Step 5: Add Wave filter

Select first layer (Letter C Layer), go to Filter>Distort>Wave. Check Type: Triangle and Repeat Edge Pixels. Set the Number of Generators: 3, Wavelength: 10 – 60, Amplitude: 5 – 35 and Scale: 15% – 15%. Select each layer one by one and hit Cmd/Ctrl+F to apply the filter.
Step 6: Place your image

GotoFile>Place. Choose any milk splash image and place over the text layer. Now right-click and click Rasterize Layer.
Step 7: Enhance the image

Go to Image>Adjustment>Levels, change the Input Levels Lighter Shadows and midtone brighter.
Step 8: Select required image

Grab the Magic Wand (A), set Tolerance: 40, select the backdrop and hit delete.
Step 9: Apply Free Transform

Hit Cmd/Ctrl+T, the image get selected, scale it as required.
Step 10: Blend image

Drag the layer on top of the first letter set to 60% Opacity and Cmd/ Ctrl-click to select the letter. Grab the Eraser(E), pick a soft brush and erase the edges.
Step 11: Download Brushes
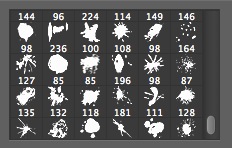
You can add more images for each layer or can also use brush set. We have used Splat 25 Brushes brush set from http://pervoibrushes.deviantart.com/art/Splat-55997796 and save them.
Step 12: Load Brushes
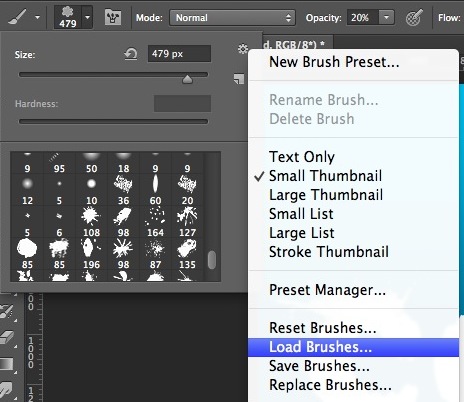
Select the Brush tool (B) and open the Brush Preset Picker from the Tool Options. Click on the top-left menu, choose Load Brushes, locate the folder and click Load. Create a new layer, select any brush and paint around each image.
Step 13: Merge Layers

Hit Cmd and select the text, splat and brushes layers from each letter. Hit Cmd/Ctrl+E to merge the layers, then hit Cmd/ Ctrl+Shift+N for each layer. In the New Layer window, name it ‘Color 1’, check Use Previous Layer to create clipping mask and change the Mode to Multiply.
Step 14: Add Color

Select the Paint Bucket (K), choose Foreground tone you like and click to fill. Repeat this for different colours, click on Add Layer Mask and add a mask for each colour layer.
Step 15: Final Step

Grab the Brush tool, set the default Foreground/Background colour (D), grab Splat brush 96 (or any other of your choice) and paint over the layer mask to hide part of the image. Now select brush 149 (or of your choice), hit X to switch the colours and create some splashes.


